Tuesday, August 25, 2009

Spycam Video Sunglasses

The Spycam Video Sunglasses are not intended to be part of any disguise - they are the disguise - concealing a tiny video camera in the center of the glasses. Capable of capturing excellent quality video and audio, these Spycam Video Sunglasses can be

image

comfortably worn nearly anywhere to help you get the footage. Video is stored in AVI format on a Micro SD card. These glasses also feature easy-to-use controls which are located on the glasses frame. The built-in battery is rechargeable via USB connection and has a battery operating life of about 3-4 hours.

Features
  • Sunglasses that capture excellent video and audio
  • Built-in rechargeable Lithium-Ion battery
  • User friendly operation buttons for easy control
  • 4GB memory card is included (Micro SD) - supports 8GB max
  • Video file format: AVI
  • Resolution: 640x480
  • Weight is 1.4 oz (39g)
  • Includes: Sunglasses, Memory card, USB cable, User manual, Carry case, Cleansing cloth, AC Adapter

Monday, August 24, 2009

Metal Detector

The circuit described here is that of a metal detector. The opera- tion of the circuit is based on superheterodyning principle which is commonly used in superhet receivers. The circuit utilises two RF oscillators. The frequencies of both oscillators are fixed at 5.5 MHz. The first RF oscillator comprises transistor T1 (BF 494) and a 5.5MHz ceramic filter commonly used in TV sound-IF section. The second oscillator is a Colpitt�s oscillator realised with the help of transistor T3 (BF494) and inductor L1 (whose construction details follow) shunted by trimmer capacitor VC1. These two oscillators� frequencies (say Fx and Fy) are mixed in the mixer transistor T2 (another BF 494) and the difference or the beat frequency (Fx-Fy) output from collector of transistor T2 is connected to detector stage comprising diodes D1 and D2 (both OA 79). The output is a pulsating DC which is passed through a low-pass filter realised with the help of a 10k resistor R12 and two 15nF capacitors C6 and C10. It is then passed to AF amplifier IC1 (2822M) via volume
control VR1 and the output is fed to an 8-ohm/1W speaker. The inductor L1 can be constructed using 15 turns of 25SWG wire on a 10cm (4-inch) diameter air-core former and then cementing it with insulating varnish. For proper operation of the circuit it is critical that frequencies of both the oscillators are the same so as to obtain zero beat in the absence of any metal in the near vicinity of the circuit. The alignment of oscillator 2 (to match oscillator 1 frequency) can be done with the help of trimmer capacitor VC1. When the two frequencies are equal, the beat frequency is zero, i.e. beat frquency=Fx-Fy=0, and thus there is no sound from the loudspeaker. When search coil L1 passes over metal, the metal changes its inductance, thereby changing the second oscillator�s frequency. So now Fx-Fy is not zero and the loudspeaker sounds. Thus one is able to detect presence of metal.

image

Saturday, August 22, 2009

0.5v to 6v Voltage Converter Circuit


image

Conventional silicon transistors just can't operate at voltages less than about 0.7v. Old germanium transistors could be used, but those are hard to find these days and most are rather large in size. Some new n-channel MOSFET devices with very low gate-source threshold voltage can operate at quite low voltages. I've been experimenting with various devices and came up with one electronic circuit (shown below), which demonstrates how to boost the low voltage from a single solar cell to a higher voltage. The key component in the circuit below is a cheap single logic device from Texas Instruments. It turns out that TI's 74AUC family of parts can work down to about 0.45 volts. I tried one of their single schmitt trigger parts and found I was able to make on oscillator function nicely at 0.5 volts. I then used a charge pump technique and a cheap NPN transistor to form a low power flyback converter. The circuit can produce about 6 volts at the output from a 0.5v input. The idea is to use this boost circuit to generate the higher starting voltage needed by a much more powerful DC to DC converter. Once started, part of the converter's output could then be feed back to the input, to sustain converter operation. This is known as a "bootstrap" technique. In the future, I hope to post a circuit which can supply several watts of power from a 0.5v input voltage. This would be ideal for charging a battery using power from a single large solar cell or several smaller cells wired in parallel.

Tuesday, August 18, 2009

Insect Repellant

image


Notes:
Repell those repugnent insects from your Garden this Summer with this insect repellant circuit. Designed by Graham Maynard the circuitry consists of a phase locked loop (CMOS 4047) wired as a 22KHz oscillator. The output is amplified by a pair of complimentary output transistors and drives a Motorola 3.25 inch Piezo. Current drain is around 120mA so an external power supply is recommended.


The piezo used was a standard 85mm square Motorola Horn,  Maplin part number  WF09K or WF55K. These are rated +/-3dB to 28kHz.

Friday, August 14, 2009

Battery Tester Project Using LM3914 IC


This objective of this project is to design and build a battery tester that is able to test various types of dry cell and rechargable battery with a voltage of less than 2V. Configured as a bar graph battery level indicator, the LM3914 IC from National Semiconductor senses the voltage levels of the battery under test and drives the 10 LEDs to ON or OFF based on the voltage that is detected. The current driving the LEDs is regulated by using the external resistor R1 and hence limiting resistors are not required.

The schematic shows the simple connections where the reference voltage at pin 8 of U1 can be adjusted by adjusting the variable resistor VR1. The voltage at pin 8 will set the maximum scale of the LED. In testing dry cell battery of 1.5V, set the voltage at pin 8 to 2.0V. Each of the LED will thus represent 200mV when lighted up.

If testing of rechargable battery such as NiCd or NiMH is required, set the reference voltage to a lower value such as 1.5V as the typical voltage of a rechargable battery is approximately 1.2V.

When testing the battery, take note of the polarity of the probe to the terminals of the battery. T1 is to be placed on the positive terminal and T2 the negative terminal of the battery.


image

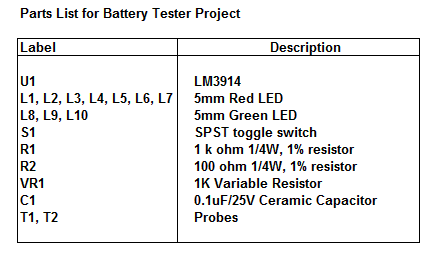
Parts List

The parts list of the project is as shown below.

Thursday, August 13, 2009

Circuit Schematic 12V LapTop Power Supply

  July 24, 2009   I have a big screen HP laptop computer.  The large brick size AC to DC power supply is rated at 19.2v and 9.5 amps, which is about 180 watts. I’d like to be able to use the thing in my car.  I looked into a 12v car adapter for it but never really found one that I liked.  Most were underpowered. The other option was to use the existing AC to DC adapter and run it off power from a 12v to 120vac inverter.

This would work but it is rather bulky and inefficient.  If I were going build my own supply, I would take a different approach.  The typical automotive DC voltage varies from about 12v to 14 volts.  This is too low to power the DC input of the laptop but it is not too far off.  My thought would be to design a DC to DC converter, whose output voltage would ride on top of the automotive 12v to 14v cigarette lighter supply.  This allows the voltage boost circuit to be smaller, since it only has to generate 5v to 7v with a current of about 10 amps.  The converter would need to be an isolated type and a simple control circuit would need to be added.  That circuit would monitor the output and control the converter supply voltage in response to load and car battery voltage variations.  The result should be a much smaller supply with a much higher efficiency.

If a 180 watt DC to DC converter were used to power the laptop, with an efficiency of about 85%, it would dissipate about 30 watts of power.  But, using my concept, the smaller converter would only dissipate 12 watts.  Overall, this would move the efficiency, when viewed by the 12v cigarette lighter supply, to about 94%.


Circuit Schematic 12V LapTop Power Supply

Saturday, July 25, 2009

High voltage stun gun


Read before building:

This device produces high voltage pulses discrupting muscles and nervous sYstem, leaving anyone who touches it in a state of menthal confusion. Can be used agains ferocious animals or attackers, BUT REMEMBER, this device may be illegal in your state (for eg where I live, these devices are banned). It is quite dangeros for peoples experiencing cardiac problems, and for electronic equipment (like peacemakers), since it generates some RF. Don't attept irresponsible actions with this device, it is not a toy.

After the introduction let's pass to the circuit.

The 555 IC is wired as a astable to produce square wave with adjustable freq and duty cycle (notice the potentiomenters and diode). This square wave is feed to a IRF840 Mosfet (no need of totem transistors since freq is low and the IC has enough current capability to rapidly charge/discharge the gate). As a substitute of the mosfet, a bipolar transistor can be used (and a 100ohm resistor between 555 and base of the transistor). Valid BJT can be BU406, but also smaller BJT can be ok, keep in mind that it must handle at least 2A continuous. The inductive kick snubber isn't needed because the power is low and it is almost totally adsorbed to charge the tank capacitor, in addition since this device is battery operated we don't want to dissipate the power on a resistor but we want it in sparks. With a snubbing network you will experience lower firing rates. USE A PUSHBUTTON SWITCH FOR SAFETY

Construction of T2: this is the real boring part. Since it is unlikely to find it in shops we need to build them. Materials needed: enamel copper wire (0,20 mm or 0,125 mm), ferrite stick, LDPE sheets (0,25 mm). Secure the ferrite stick with a layer of ldpe (polyethilene, as a substiture use electric insulating tape) and glue it (or tape it) Place 200-250 windings on the ldpe (even more windings if the stick is more than 1'), another ldpe layer, another 200-250 windings and so on to finally have 5-6 layers (approx 1000-1400 turns but even more doesn't hurt performance, but be careful for internar arcing that will ruin it). Insulate it again and place the primary winding, 15-20 turns of 1mm wire are just ok, too much windings (too mush resistance and inductance) will lead to smaller current and smaller spike in T2 secondary because of lower rise time,and too few will not saturate the core. I chosen MKP capacitors because they have low ESR and ESL (they are widely used in tesla coils as mmc capacitors).

The spark gap can be simple two crossed (but not touching) 1 mm spaced wires. It acts as a voltage controlled switch, firing when
the voltage is enough to ionize the air between them (turning it to plasma with small resistance). Keep in mind that it would
be wise do place it into a small plastic container and fill with oil letting bubbles out (don't use motor oir or frying oil
but pure mineral oil which has no water in it.

Disclaimer: As i have seen before, IT IS NOT A TOY, DON'T DO ANYTHING STUPID WITH IT. I DON'T ACCEPT ANY RESPONSIBILITY OF DAMAGES DONE TO OTHER PEOPLE OR YOURSELF WITH THIS DEVICE. IF YOU WANT TO BUILD IT YOU MUST ACCEPT THIS CONDITION. Using the procedures described above would prevent you from any damages/troubles. Don't carry it in streets or public places if they are banned in your country, and don't use it near electronic devices. As the wise man says use it like a deterrent, even against animals.


Light/dark detector


This handy little circuit can tell the difference between darkness and light, making it very useful for switching on and off signs, porch lights or other things when it gets dark or ligh

Parts:


Part


Total Qty.

Description

Substitutions


R1


1

100K Pot


Q1


1

2N3904 NPN Transistor

2N2222


Q2


1

NPN Phototransistor


RELAY


1

9V Relay


MISC


1

Board, Wire, 9V Battery Snap (if battery used), Knob For R1


Notes:

1. R1 Adjusts sensitivity

Park aid


Parts:
R1_____________10K   1/4W Resistor
R2,R5,R6,R9_____1K 1/4W Resistors
R3_____________33R 1/4W Resistor
R4,R11__________1M 1/4W Resistors
R7______________4K7 1/4W Resistor
R8______________1K5 1/4W Resistor
R10,R12-R14_____1K 1/4W Resistors


C1,C4___________1΅F 63V Electrolytic or Polyester Capacitors
C2_____________47pF 63V Ceramic Capacitor
C3,C5_________100΅F 25V Electrolytic Capacitors

D1_____________Infra-red LED
D2_____________Infra-red Photo Diode (see Notes)
D3,D4________1N4148 75V 150mA Diodes
D5-7___________LEDs (Any color and size)

IC1_____________555 Timer IC
IC2___________LM324 Low Power Quad Op-amp
IC3____________7812 12V 1A Positive voltage regulator IC


Device purpose:

This circuit was designed as an aid in parking the car near the garage wall when backing up. LED D7 illuminates when bumper-wall distance is about 20 cm., D7+D6 illuminate at about 10 cm. and D7+D6+D5 at about 6 cm. In this manner you are alerted when approaching too close to the wall.
All distances mentioned before can vary, depending on infra-red transmitting and receiving LEDs used and are mostly affected by the color of the reflecting surface. Black surfaces lower greatly the device's sensitivity.
Obviously, you can use this circuit in other applications like liquids level detection, proximity devices etc.

Circuit operation:

IC1 forms an oscillator driving the infra-red LED by means of 0.8mSec. pulses at 120Hz frequency and about 300mA peak current. D1 & D2 are placed facing the car on the same line, a couple of centimeters apart, on a short breadboard strip fastened to the wall. D2 picks-up the infra-red beam generated by D1 and reflected by the surface placed in front of it. The signal is amplified by IC2A and peak detected by D4 & C4. Diode D3, with R5 & R6, compensate for the forward diode drop of D4. A DC voltage proportional to the distance of the reflecting object and D1 & D2 feeds the inverting inputs of three voltage comparators. These comparators switch on and off the LEDs, referring to voltages at their non-inverting inputs set by the voltage divider resistor chain R7-R10.

Notes:

  • Power supply must be regulated (hence the use of IC3) for precise reference voltages. The circuit can be fed by a commercial wall plug-in power supply, having a DC output voltage in the range 12-24V.

  • Current drawing: LEDs off 40mA; all LEDs on 60mA @ 12V DC supply.

  • The infra-red Photo Diode D2, should be of the type incorporating an optical sunlight filter: these components appear in black plastic cases. Some of them resemble TO92 transistors: in this case, please note that the sensitive surface is the curved, not the flat one.

  • Avoid sun or artificial light hitting directly D1 & D2.

  • If your car has black bumpers, you can line-up the infra-red diodes with the (mostly white) license or number plate.

  • It's wiser to place all the circuitry near the infra-red LEDs in a small box. The 3 signaling LEDs can be placed far from the main box at an height making them well visible by the car driver.

  • The best setup is obtained bringing D2 nearer to D1 (without a reflecting object) until D5 illuminates; then moving it a bit until D5 is clearly off. Usually D1-D2 optimum distance lies in the range 1.5-3 cm.

  • If you are needing a simpler circuit of this kind driving a LED or a relay, click Infra-red Level Detector

Speed limit alert


Parts:
R1,R2,R19_______1K   1/4W Resistors
R3-R6,R13,R17_100K 1/4W Resistors
R7,R15__________1M 1/4W Resistors
R8_____________50K 1/2W Trimmer Cermet
R9____________470R 1/4W Resistor
R10___________470K 1/4W Resistor
R11___________100K 1/2W Trimmer Cermet (see notes)
R12___________220K 1/4W Resistor (see notes)
R14,R16________68K 1/4W Resistors
R18____________22K 1/4W Resistor
R20___________150R 1/4W Resistor (see notes)

C1,C7_________100΅F 25V Electrolytic Capacitors
C2,C3_________330nF 63V Polyester Capacitors
C4-C6___________4΅7 25V Electrolytic Capacitors

D1,D5______Red LEDs 3 or 5mm.
D2,D3________1N4148 75V 150mA Diodes
D4________BZX79C7V5 7.5V 500mW Zener Diode

IC1__________CA3140 or TL061 Op-amp IC
IC2____________4069 Hex Inverter IC
IC3____________4098 or 4528 Dual Monostable Multivibrator IC

Q1,Q2_________BC238 25V 100mA NPN Transistors

L1_____________10mH miniature Inductor (see notes)

BZ1___________Piezo sounder (incorporating 3KHz oscillator)

SW1____________SPST Slider Switch

B1_______________9V PP3 Battery (see notes)

Clip for PP3 Battery


Device purpose:

This circuit has been designed to alert the vehicle driver that he has reached the maximum fixed speed limit (i.e. in a motorway). It eliminates the necessity of looking at the tachometer and to be distracted from driving.
There is a strict relation between engine's RPM and vehicle speed, so this device controls RPM, starting to beep and flashing a LED once per second, when maximum fixed speed is reached.
Its outstanding feature lies in the fact that no connection is required from circuit to engine.

Circuit operation:

IC1 forms a differential amplifier for the electromagnetic pulses generated by the engine sparking-plugs, picked-up by sensor coil L1. IC2A further amplifies the pulses and IC2B to IC2F inverters provide clean pulse squaring. The monostable multivibrator IC3A is used as a frequency discriminator, its pin 6 going firmly high when speed limit (settled by R11) is reached. IC3B, the transistors and associate components provide timings for the signaling part, formed by LED D5 and piezo sounder BZ1. D3 introduces a small amount of hysteresis.

Notes:

  • D1 is necessary at set-up to monitor the sparking-plugs emission, thus permitting to find easily the best placement for the device on the dashboard or close to it. After the setting is done, D1 & R9 can be omitted or switched-off, with battery saving.

  • During the preceding operation R8 must be adjusted for better results. The best setting of this trimmer is usually obtained when its value lies between 10 and 20K.

  • You must do this first setting when the engine is on but the vehicle is stationary.

  • The final simplest setting can be made with the help of a second person. Drive the vehicle and reach the speed needed. The helper must adjust the trimmer R11 until the device operates the beeper and D5. Reducing car's speed the beep must stop.

  • L1 can be a 10mH small inductor usually sold in the form of a tiny rectangular plastic box. If you need an higher sensitivity you can build a special coil, winding 130 to 150 turns of 0.2 mm. enameled wire on a 5 cm. diameter former (e.g. a can). Extract the coil from the former and tape it with insulating tape making thus a stand-alone coil.

  • Circuit's current drawing is approx. 10mA. If you intend to use the car's 12V battery, you can connect the device to the lighter socket. In this case R20 must be 330R.

  • Depending on the engine's cylinders number, R11 can be unable to set the device properly. In some cases you must use R11=200K and R12=100K or less.

  • If you need to set-up the device on the bench, a sine or square wave variable generator is required.

  • To calculate the frequency relation to RPM in a four strokes engine you can use the following formula:
    Hz= (Number of cylinders * RPM) / 120.
    For a two strokes engine the formula is: Hz= (Number of cylinders * RPM) / 60.
    Thus, for a car with a four strokes engine and four cylinders the resulting frequency @ 3000 RPM is 100Hz.

  • Temporarily disconnect C2 from IC1's pin 6. Connect the generator's output to C2 and Ground. Set the generator's frequency to i.e. 100Hz and regulate R11 until you hear the beeps and LED D5 flashes. Reducing the frequency to 99 or 98 Hz, beeping and flashing must stop.

  • This circuit is not suited to Diesel engines.